The importance of IP filters
When you visit your own website, you obviously don’t want your own visit to cloud your data. In order to overcome this and keep your data clean, you can define internal traffic by setting up IP filters.
When you have set up Google Analytics 4, however, it is ofcourse possible that you have forgotten this, or that you have not yet added the IP addresses of everyone who works on the website as a filter. Make sure you have excluded all internal traffic and keep your data clean.
In Universal Analytics, it became increasingly difficult to filter IP addresses. Fortunately, in GA4 this is not the case and you can again exclude specific IP addresses without any worries.
You have to set up IP filters in 2 steps:
- Define internal traffic rules.
- Configure Data Filters.
Define internal traffic rules
Step 1: Go to Admin > Data Streams > Select the data stream you want to apply the IP filter to.
Step 2: Secondly, click on Configure tag settings.
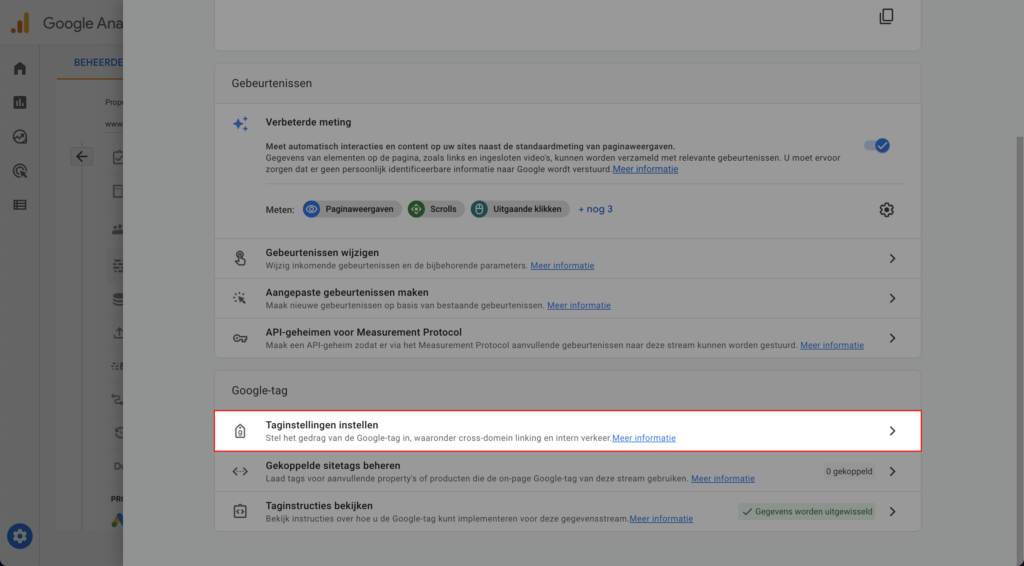
Step 3: Click on Show all and then the option to ‘Define internal traffic’ will appear, click on it.

Step 4: Choose a name of which you’ll understand the meaning when you look at your filters later on, the name you choose doesn’t affect the function of the filter. For now I’d keep the traffic_type value on ‘internal’. If you choose any other name, you’ll have to set up a custom data filter later on to exclude that specific value. Next, choose the right match type (again this depends on the way you want the filter to work, but to keep it simple I’d choose ‘IP address equals’. Then fill in your IP address in the value field. Now you’re done, so you can click on the blue ‘Create’ button on the top-right corner of your screen.

Configure Data Filters
Just defining the traffic rules on itself isn’t enough to actually exclude the IP adresses. You’ve only created rules you can now use in your data filters. I’ll try to explain this a bit more. By defining traffic rules you’re basically labeling your visitors. The match type and value determine what you’ll label and the traffic_type value is the name of the label. But only by labeling something, you’re not taking action yet. That’s where the data filters come in. With data filters you’re determining what action should be taken for a specific traffic_type. There are two actions you can take: Exclude or Include. And there are 3 states you can apply to a filter: testing (which basically means it’s observing and labeling so you can see whether it works the way you want it to), active (which means the filter is being executed) and inactive (which means the filter has no effect on your data).
You can configure data filters as follows:
Step 1: Go to: Admin > Data Settings > Data Filters
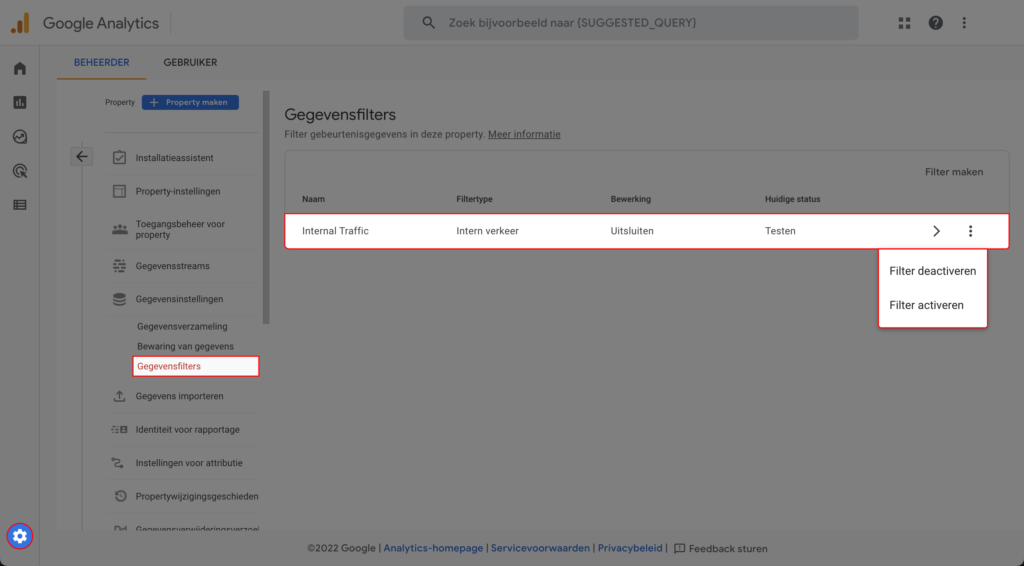
Step 2: Click the Internal Traffic filter.
Step 3: Change the Filter State to ‘Active’.
Step 4: Don’t forget to save your changes.
Did you choose a different traffic type when creating IP filters? Then create a new filter in which you exclude that specific traffic.
When you have set a filter to active, you can deactivate it and then set it to testing or active again. When the filter is set to active, you will not see yourself in the DebugView either.