This is the third article in my Google Analytics 4 setup guide. In the first article of this GA4 guide you've learned how to create a new Google Analytics 4 property and in the second article you've learned how to implement the property on your website. Before you sit back and wait for the data to come in, there are a few things that you should configure in advance. In this blog I help you to set up Google Analytics 4 properly.
In this blog I will not cover all available settings in GA4. There are a number of things that are already set up good by default. Instead, I will only discuss some basic settings that I almost always change / set up after implementing GA4.
Table of contents:
- 1. Property Access Management
- 2. Data Streams
- 2.1. Define internal traffic
- 2.2. Cross-domain tracking
- 2.3. List unwanted referrals
- 3. Data Settings
- 3.1. Data Collection
- 3.2. Data Retention
- 3.3. Data Filters
- 4. Product Links
Events, conversions, audiences, custom definitions and the attribution settings will be discussed in future articles.
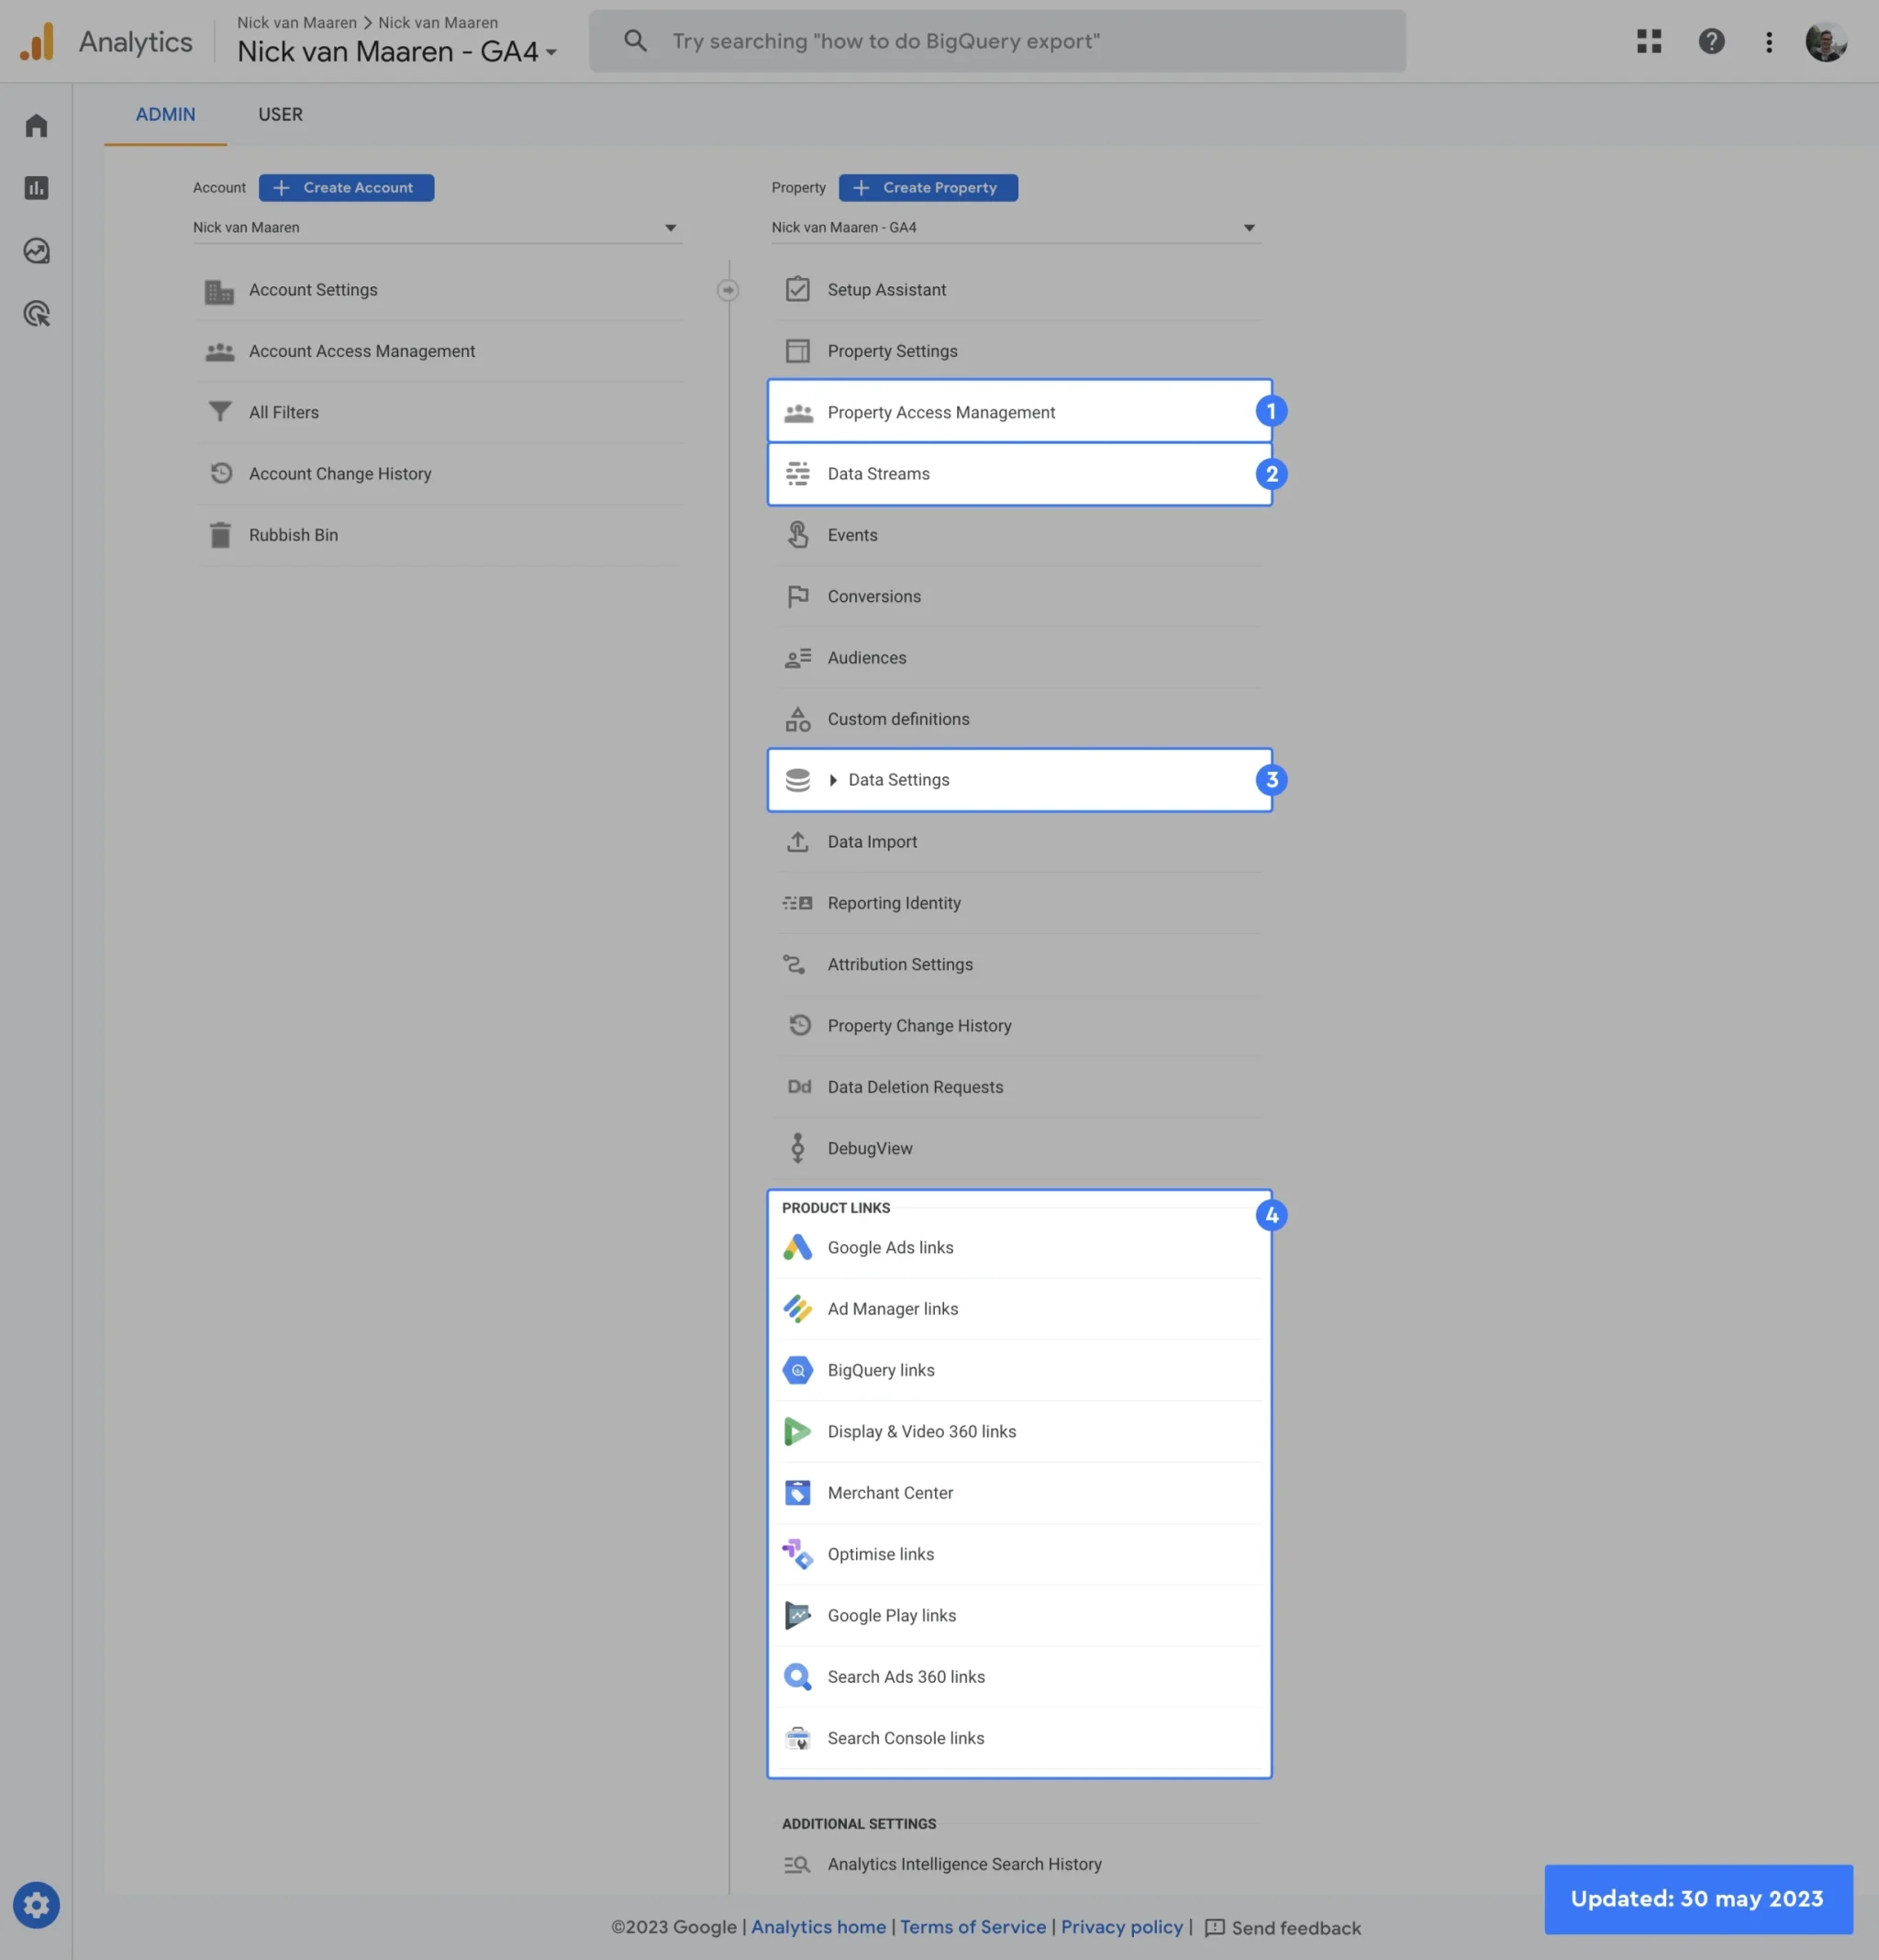
1. Property Access Management
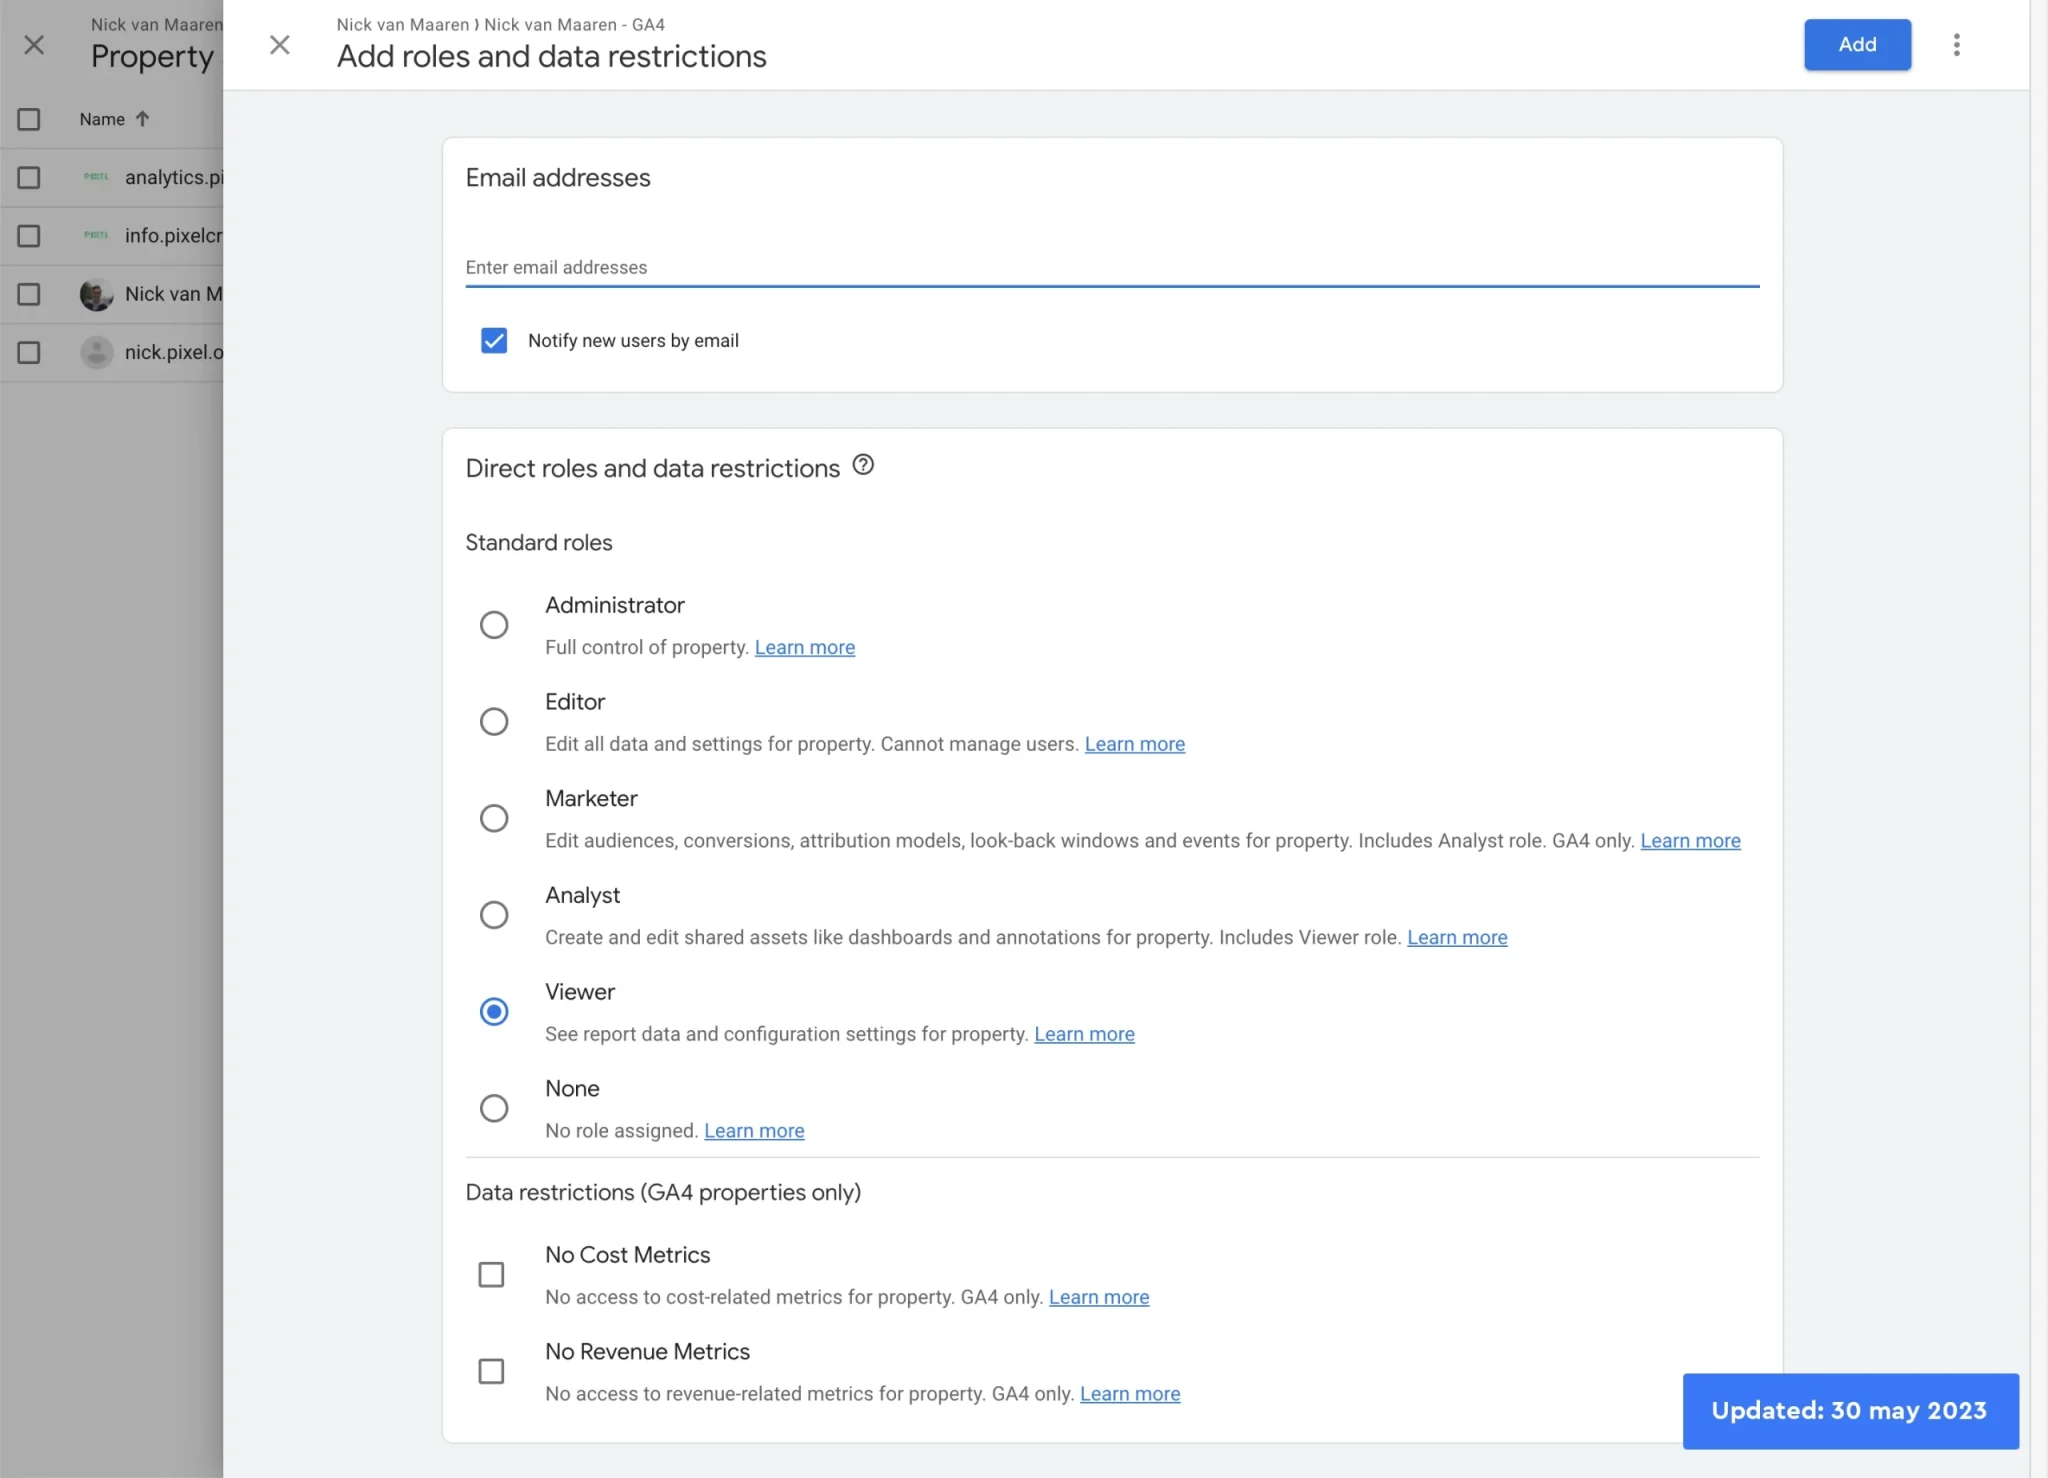
After creating a property, one of the first things I often do is to invite the right people. You can invite users at the account level or at the property level. There are 5 roles you can assign a user:
- Administrator: An administrator has full access. Administrators can give or take access to or from other users and change roles on the account and/or property level.
- Editor: An editor can edit the settings of the property. The only thing they can not do is manage the access of the account and/or property.
- Marketer: A marketer can create, edit or delete audiences, conversions, attribution-models, events and lookback windows.
- Analyst: An analyst can create, edit, and delete certain property assets. Can collaborate on shared assets.
- Viewer: A viewer can see settings and data; can change which data appears in reports (e.g., add comparisons, add a secondary dimension); can see shared assets via the user interface or the APIs. Cannot collaborate on shared assets. For example, shared explorations can be viewed, but not edited, by those with a Viewer role.
Next to the 5 roles, there are two data-restriction options:
- No Cost Metrics: Regardless of the given role, cannot see metrics related to cost.
- No Revenue Metrics: Regardless of the given role, cannot see metrics related to revenue.
Depending on the agreements you have made with others, you always decide for yourself which rights you give someone. As a customer of an agency, make sure that you always have administrative rights at account level.
2. Data Streams
A GA4 property collects data through data streams. To collect the right data, there are a few things to set per stream, such as:
2.1. Define internal traffic
In Google Analytics 4 you can again exclude IP addresses easily. This was difficult to do in Universal Analytics when IP anonymization was enabled.
You can define internal traffic under: Data Streams > Click your data stream > Configure tag settings > Show all > Define internal traffic.
On the top-right corner, click the blue Create button.
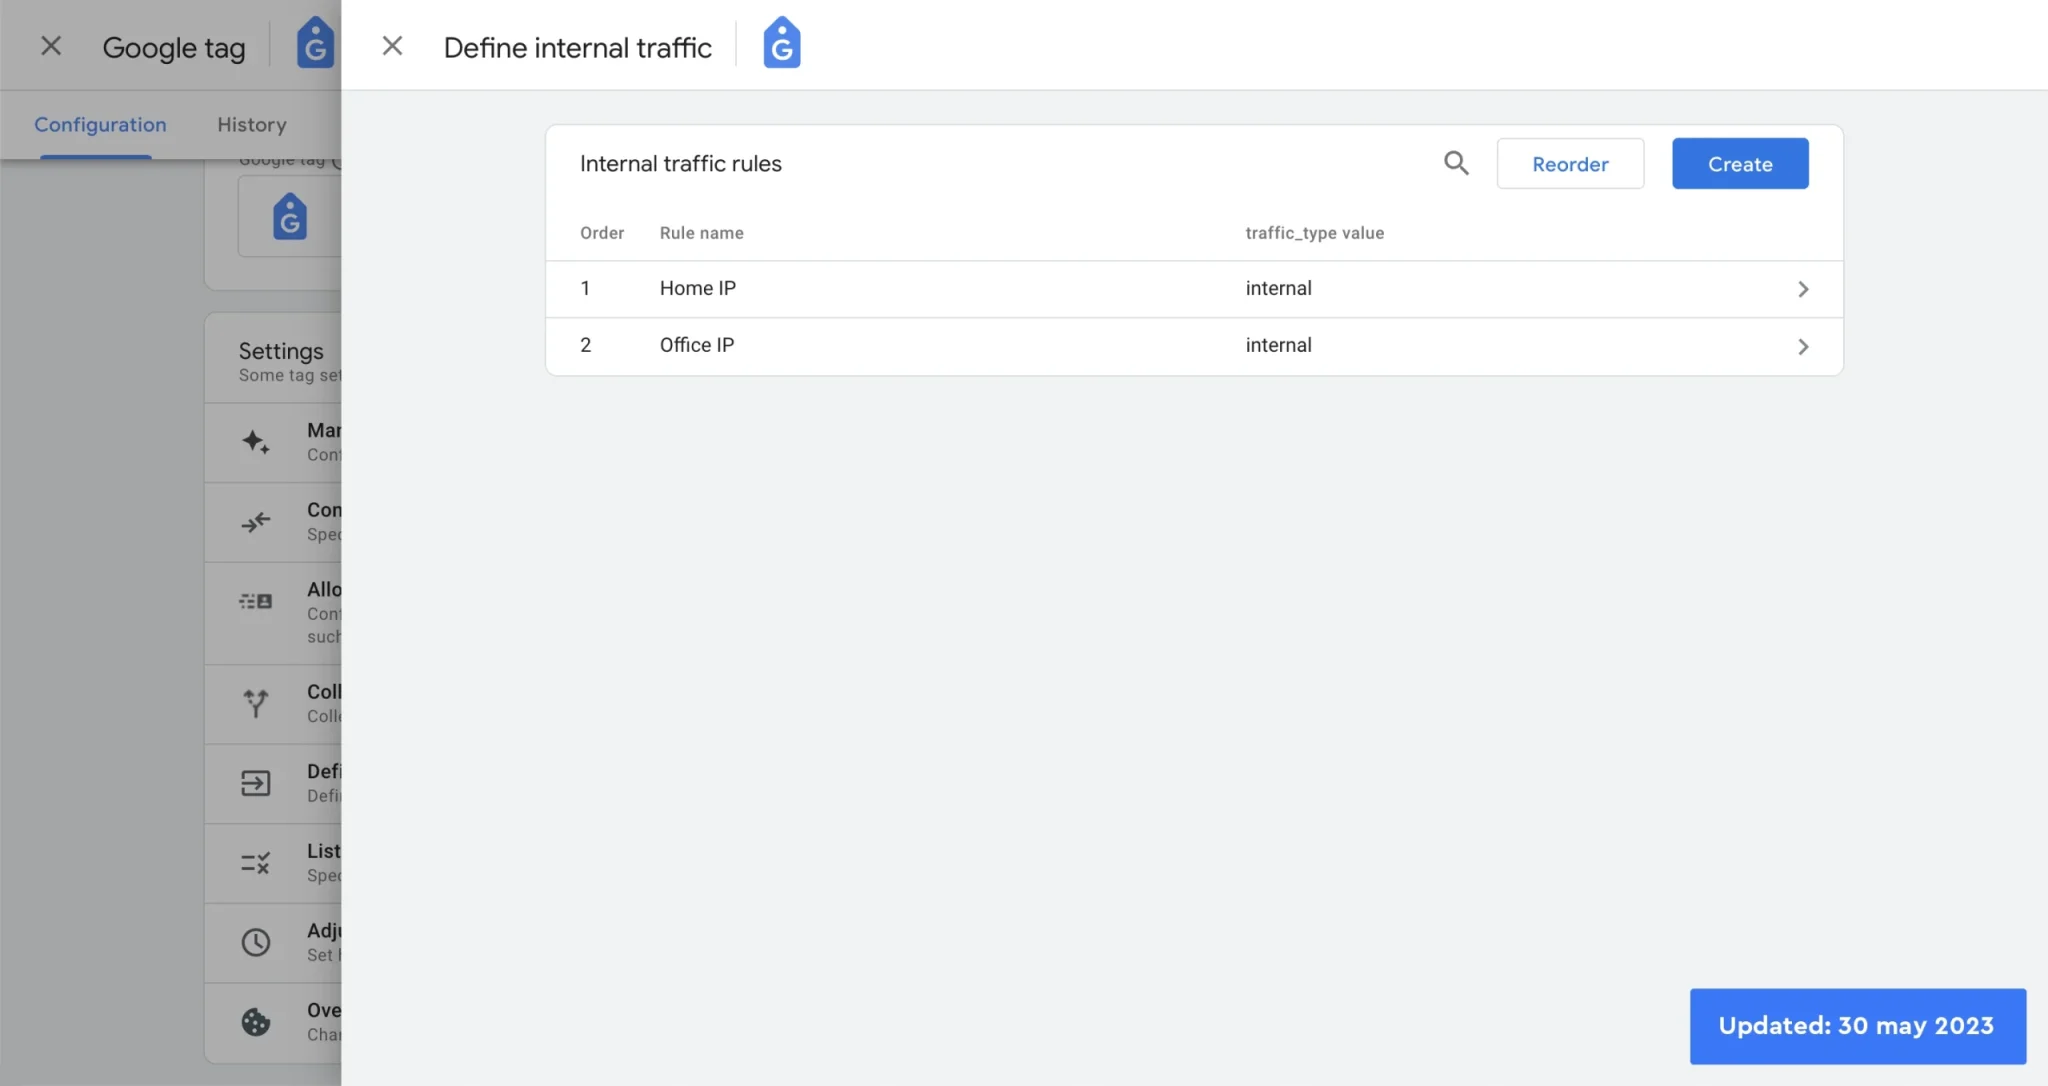
You’ll see the screen below where you can make a new traffic rule.
- The rule name is only important for your own use, it doesn’t affect anything.
- The traffic type value is set to ‘internal’ by default. You can use the value later on to make ‘filter sets’ you can treat differently. My advice would be to leave it on ‘internal’ though.
- Fill in your IP address in the value field and choose the correct match type. Change the match type to IP address equals if you want to exclude only that specific address.
- You can add multiple IP addresses in a single traffic rule. Just make your filters stays structured and its clear what everything does.
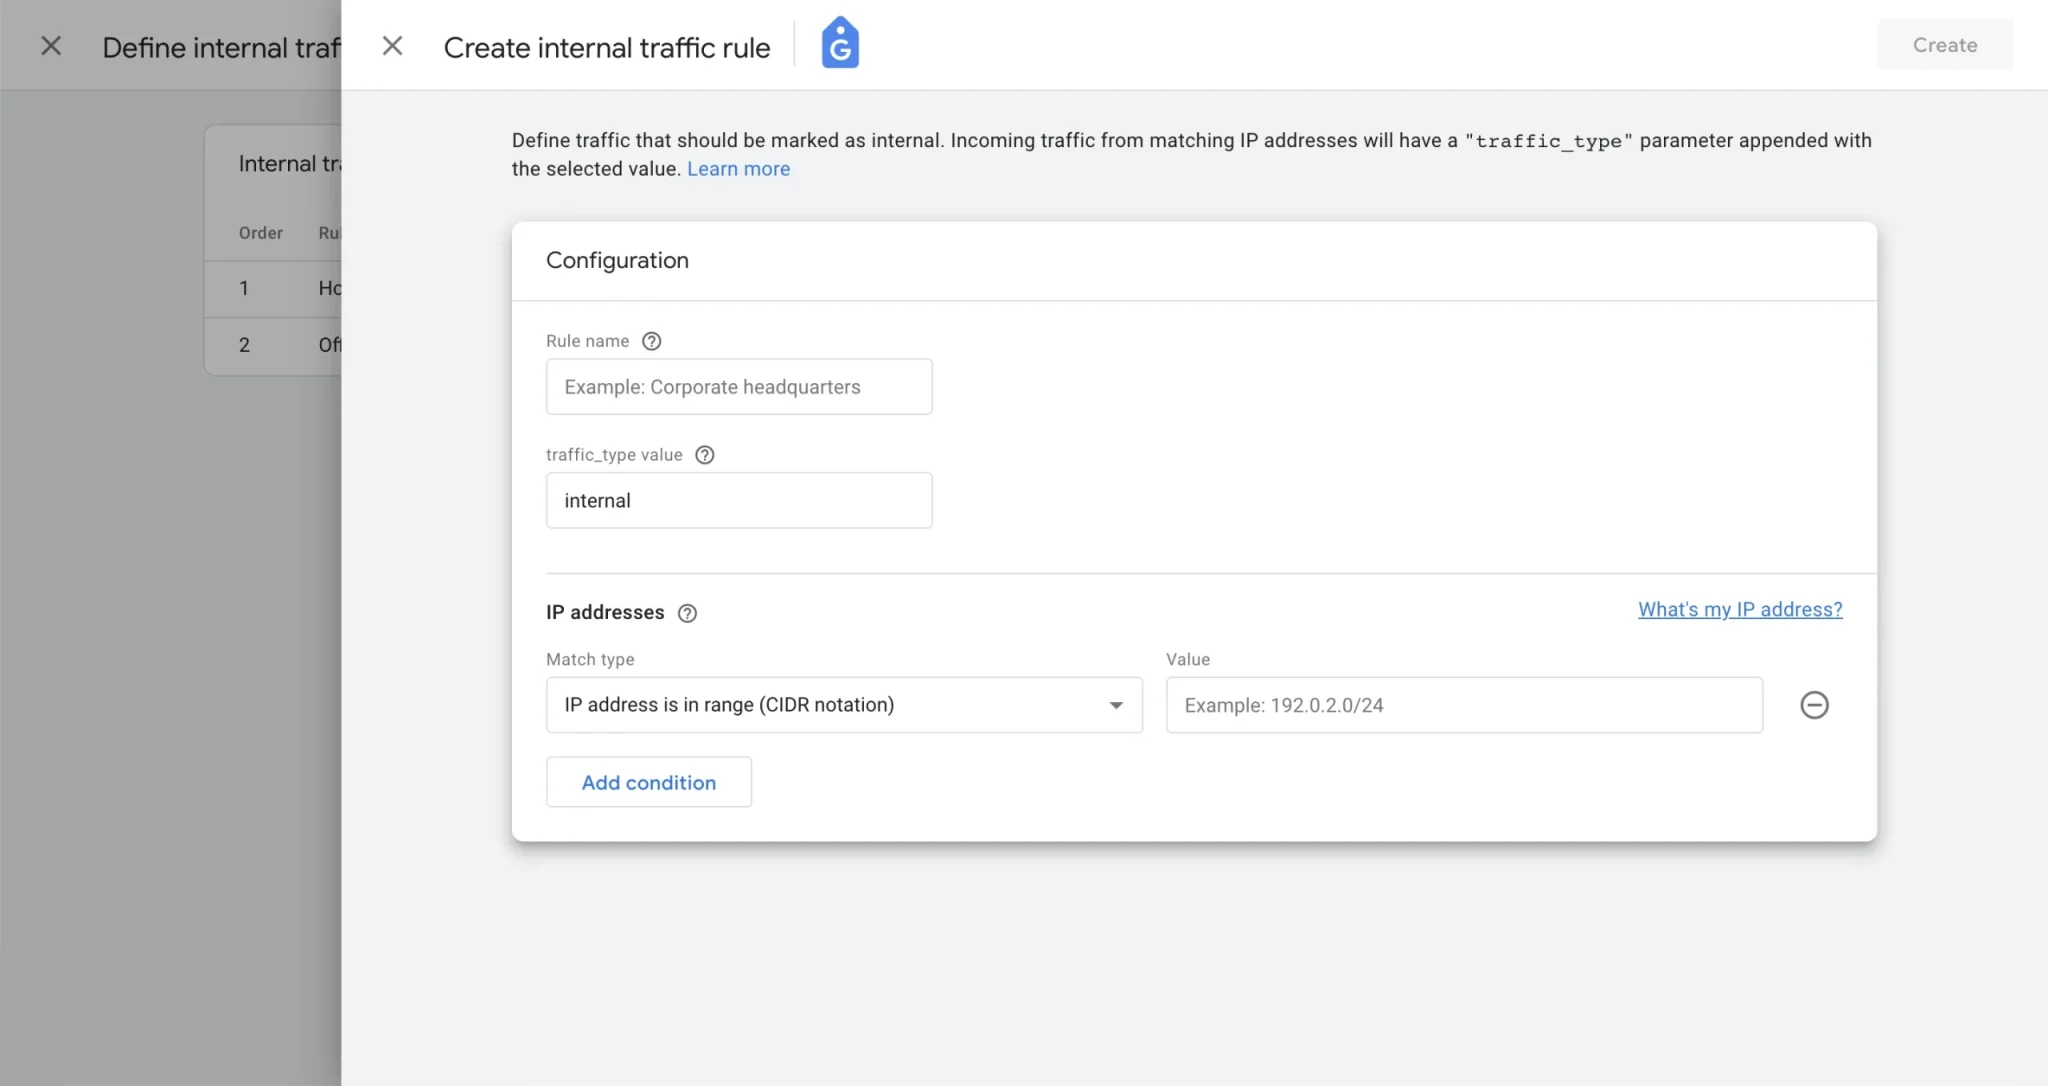
After saving your rule you’ll need to activate the filters. You can do this under: Data Settings > Data Filters (check paragraph 3.3).
2.2. Cross-domain tracking
Do you have little experience with Google Analytics? Then leave cross-domain tracking to someone who has more experience with this (to avoid problems). If you have multiple domains that you would like to measure in one property, it is important to set up cross-domain tracking. This means that you use the same tracking code on multiple domains (aka, one data stream for multiple domains).
You can set up cross domain tracking under: Data Streams > Click your data stream > Configure tag settings > Configure your domains.
You need to add all the domain names you would like to measure within one property. Suppose you have two domains: exampledomain1.com and exampledomain2.com. In this case you need to set the following under domains:
![]()
You do not need to add subdomains, if you use the same tracking code on multiple subdomains, this will automatically work. This does not require cross-domain tracking.
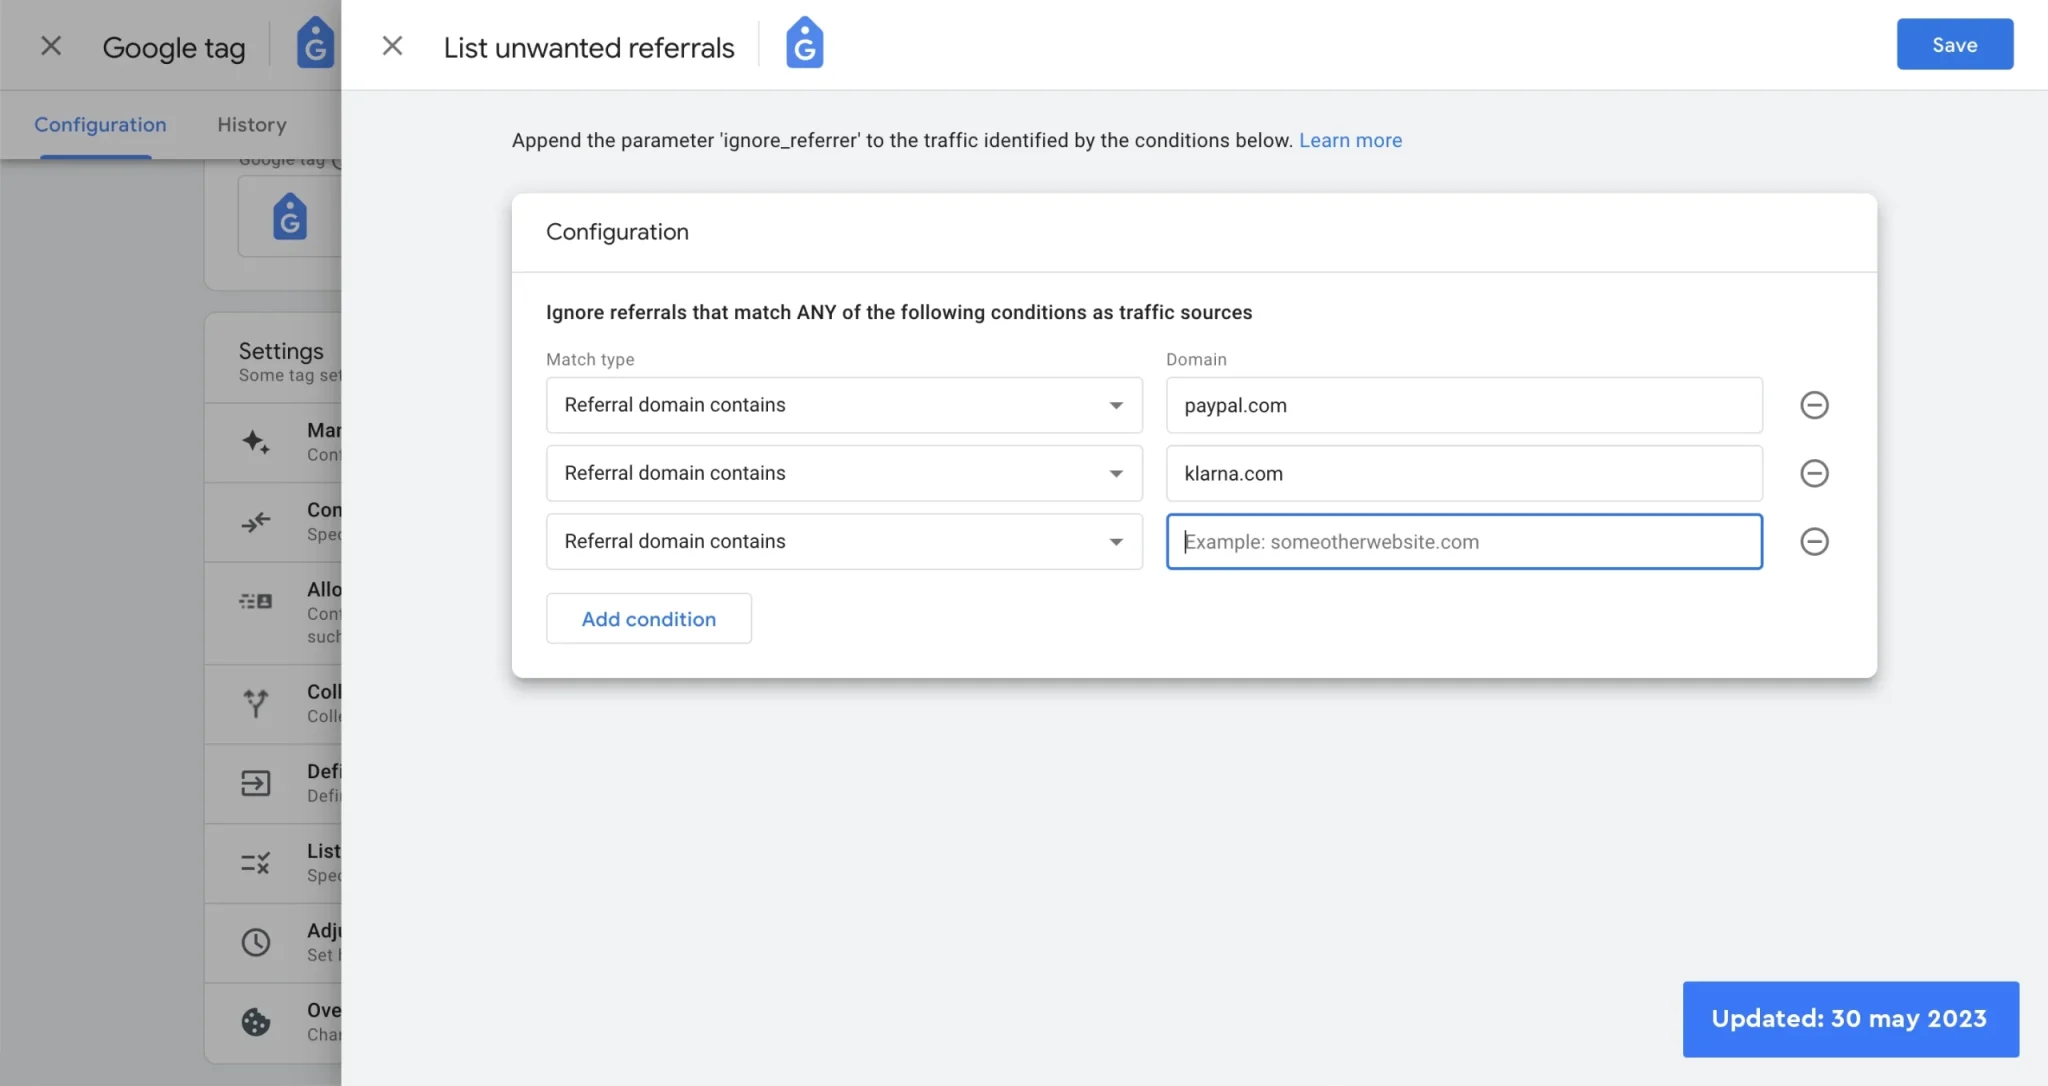
2.3. List unwanted referrals
Je kunt onder ‘Meer instellingen voor taggen’ ook een lijst met ongewenste verwijzingen maken. Hier kun je domeinen opgeven die je niet als bron wilt meten. Een veelgebruikte toepassing hiervan is bijvoorbeeld het uitsluiten van betaalproviders. Wanneer een gebruiker vanaf jouw website naar een externe website gaat en vervolgens weer terug (zonder daarbij jouw website open te laten staan) is het goed om te overwegen dit domein uit te sluiten als ‘referral’. Doe je dit niet, dan kan het beeld van welke bronnen van belang zijn vertroebelen.
You can also create a list of unwanted referrals under Data Streams > Click your data stream > Configure tag settings > Show all > List unwanted referrals. Here you can specify domains that you do not want to measure as a source. A frequently used application of this is, for example, the exclusion of payment providers. When a user goes from your website to an external website and then back again (without leaving your website open) it is good to consider excluding this domain as a ‘referral’. Failure to do so may obscure the picture of which sources are important.
3. Data Settings
Under ‘Data Settings’ there are 3 things you should change after the implementation. The Data Collection, Data Retention and Data Filters settings. For now you can ignore Channel groups.
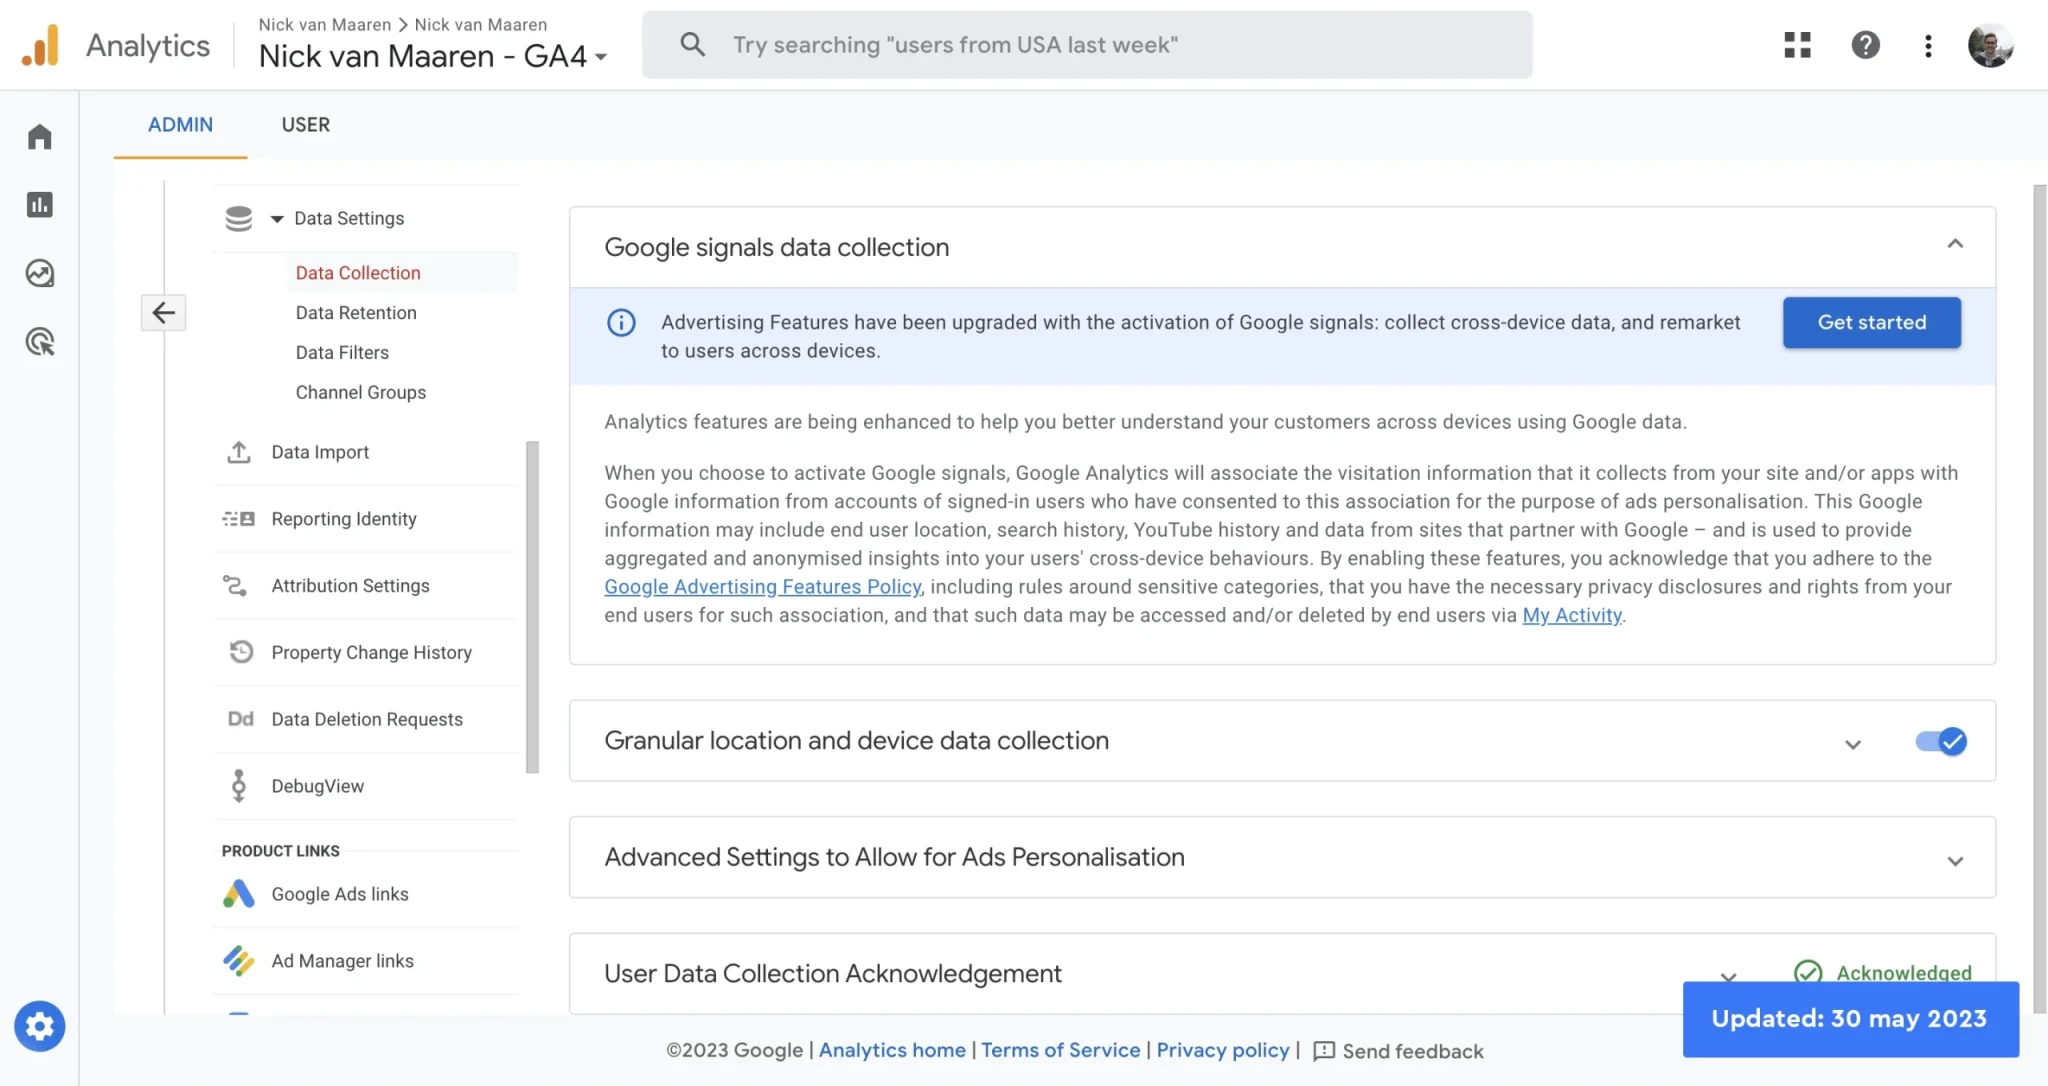
3.1. Data Collection
If you plan to get started with remarketing, it is useful to activate Google signals and Ad personalization under ‘Data collection’. You can do this simply by clicking the ‘Get started’ button for both parts. When you enable these features, it is important to state this in your privacy policy. In one of my later articles I’ll tell you more about conforming to the GDPR.
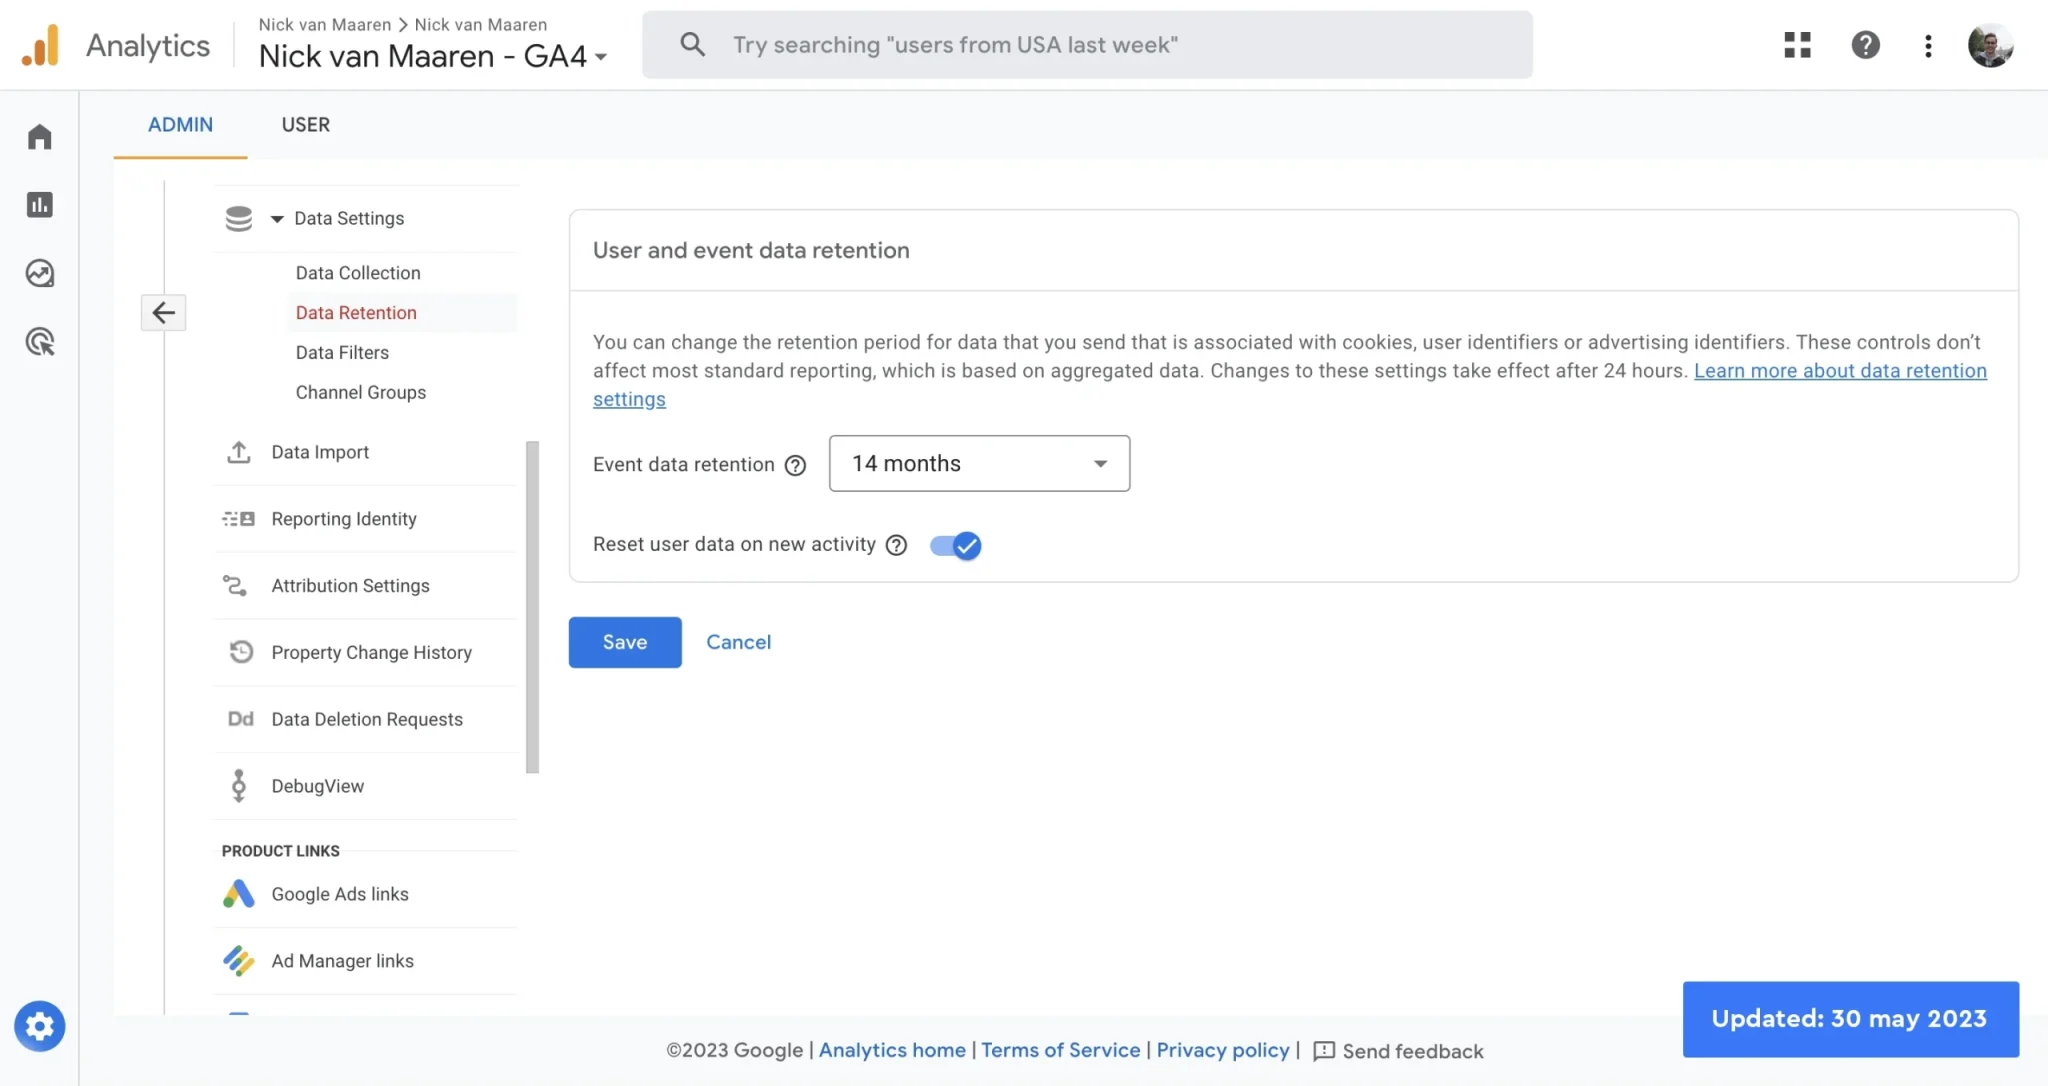
3.2. Data Retention
By default, events in Google Analytics 4 are only kept for 2 months. This is very short. It is therefore advisable to increase the retention period from 2 to 14 months as soon as possible.
3.3. Data Filters
Creating traffic rules (as explained in paragraph 2.1.) isn’t enough for them to actually work. By default the ‘internal’ traffic filter is set to ‘Testing’ and you should manually activate it. A filter can have three statuses: testing, inactive and active. If you want to exclude IP addresses, set it to ‘Active’ and save the changes.
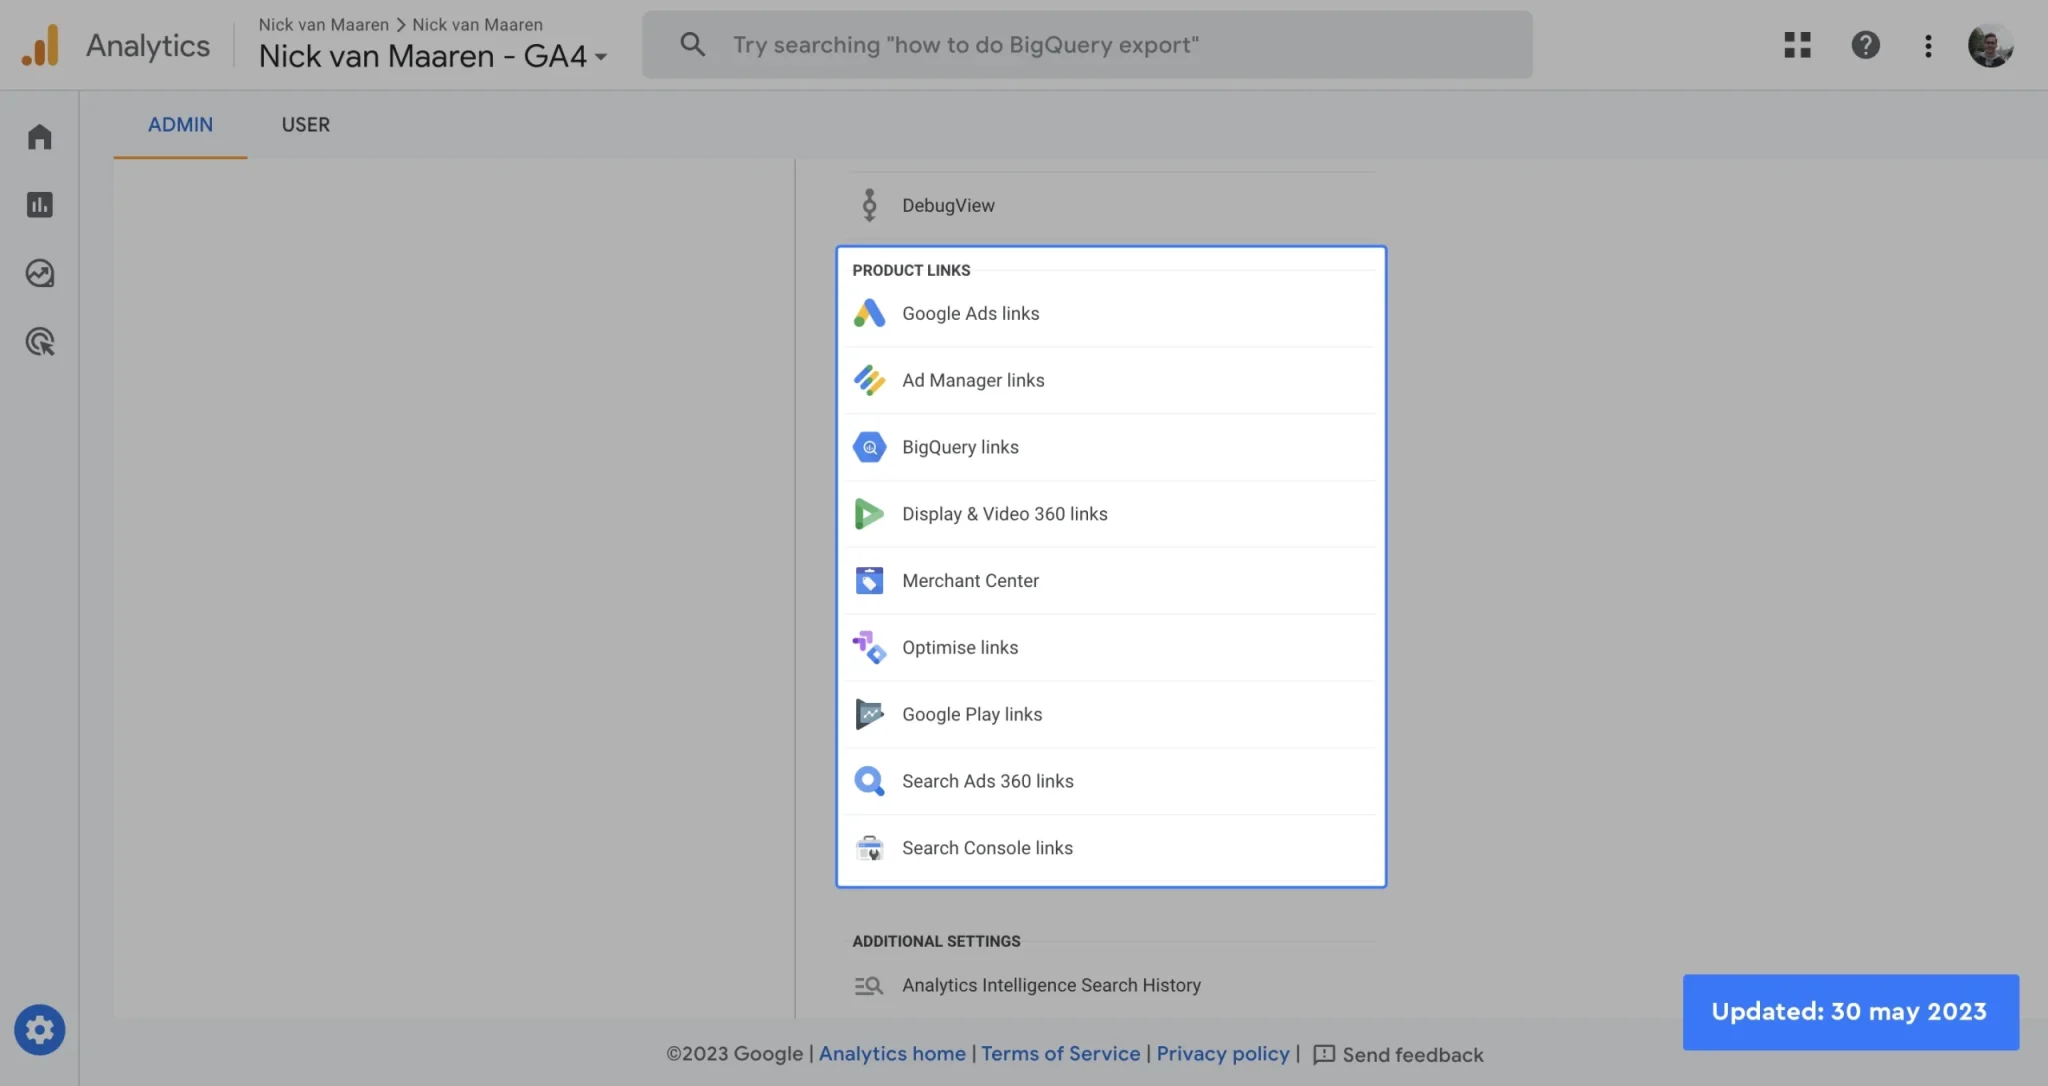
4. Product Links
Depending on the tools used, it is good to make links between Google Analytics 4 and other products such as Google Ads and Google Search Console. Setting this up is self-explanatory. Of course you also need access to the other tool to make the connection.
At the moment of writing this update (30 may 2023), there are 9 product links to add (as you can see in the screenshot below). The links I use most are the Google Search Console, Google Ads and Google Merchant Center links. You should at least have Google Search Console and link it. If you use Google Ads, definitely add Google Ads too. And if you’re setting it up for a webshop, don’t forget to link the merchant center account.